TM 5-3895-359-14&P
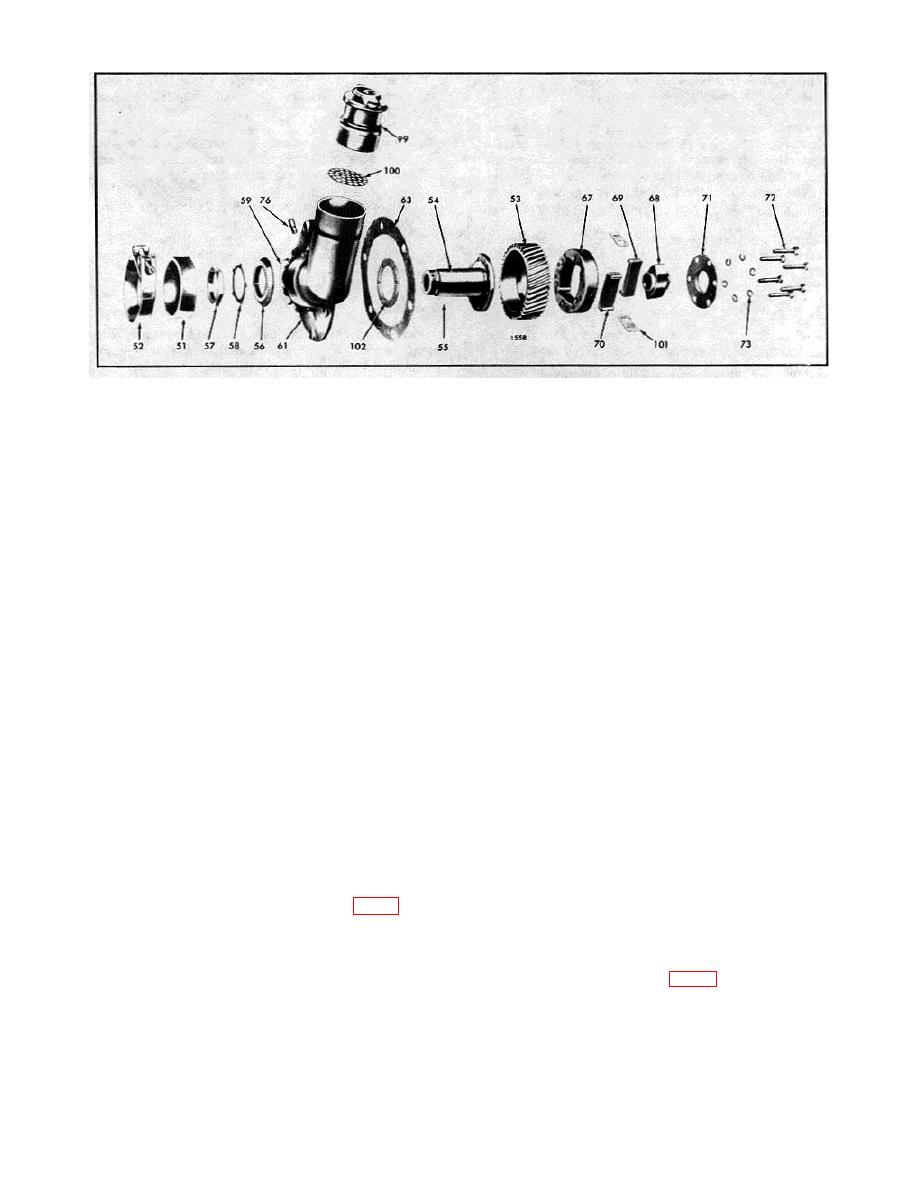
Fig. 5. Typical Blower Drive Gear Details and Relative Location of Parts
51.
Seal-Drive Cover
57. Nut-Drive Gear
68. Cam-Drive Coupling
73. Lock Washer
52.
Clamp-Cover Seal
Hub
69. Spring (Pack)-Drive
76. Elbow-Oil Pipe
53.
Gear-Blower Drive
58. Lock Washer
Coupling
99. Cap-Oil Filler
54.
Hub-Drive Gear
61. Support-Drive Gear
70. Seat-Coupling Spring
100. Strainer-Oil Filler
55.
Lock Ball
Hub
71. Retainer-Drive
101. Seat-Coupling Spring
56.
Washer-Drive Gear 63. Gasket
Coupling
End
Hub Thrust
67. Support-Drive Coupling 72. Bolt-Drive Coupling
102. Washer-Thrust
3.
Lubricate the drive gear hub, bearings in the
Replace the blower drive shaft if the serrations are worn
support, thrust surfaces and blower drive thrust washer
or damaged.
with engine oil.
Inspect the blower drive coupling support, cam, spring
4.
Place the thrust washer (102) on the protruding
seats and spring packs. Replace worn or damaged
bearing in the gear side of the support and insert the
parts.
blower drive gear hub and gear assembly.
The current blower drive couplings incorporate spring
5.
Locate the lock ball (55) in its place on the drive
seats which prevent pressure and wear from the spring
gear hub and slide the hub thrust washer (56) into
packs on the coupling, thereby prolonging the life of the
position over the lock ball. The thrust washer must be
coupling. Shorter springs are required for use with the
installed with the tapered face toward the threads on the
spring seats. When a spring replacement is necessary,
hub.
the new springs and spring seats, available in a kit, must
be installed.
6.
Install a new lock washer (58) and finger tighten
the nut (57) on the hub. Install two bolts into the
Examine the blower drive gear. If the teeth are
threaded holes in the drive gear hub. Place a suitable
excessively worn, scored or pitted, the gear must be
holding bar across the bolts to keep the hub from
replaced.
rotating and tighten the hub nut to 50-60 lb-ft torque.
Bend the ears of the lock washer against the nut to lock
Assemble Blower Drive Gear and Support Assembly
the nut in place. Remove the two bolts.
The relative location of the parts is shown in Fig. 5.
7.
Assemble the blower drive coupling.
1.
Secure the blower drive gear support (61) in a
vise with soft jaws.
a. Place the drive coupling support (67) on wood
blocks as shown in Fig. 6.
2.
Press the drive gear hub (54) into the drive gear
b. Install the spring end seats (101) and place the
(53).
spring seats (70) in each corner of the drive
coupling support.
10-2-126


