TM 5-3895-359-14&P
on the top and bottom surfaces. Replace the insert if
there is evidence of brinelling.
A used cylinder liner must be honed for the following
reasons:
NOTE: Do not modify the surface finish in a
new service liner. Since the liner is properly
finished at the factory, any change will
adversely affect seating of the piston rings.
1. Break the glaze (Fig. 5) due to the rubbing action of
the piston rings which results after long periods of
operation. Unless this glaze is removed, the time
required to seat new piston rings will be lengthened.
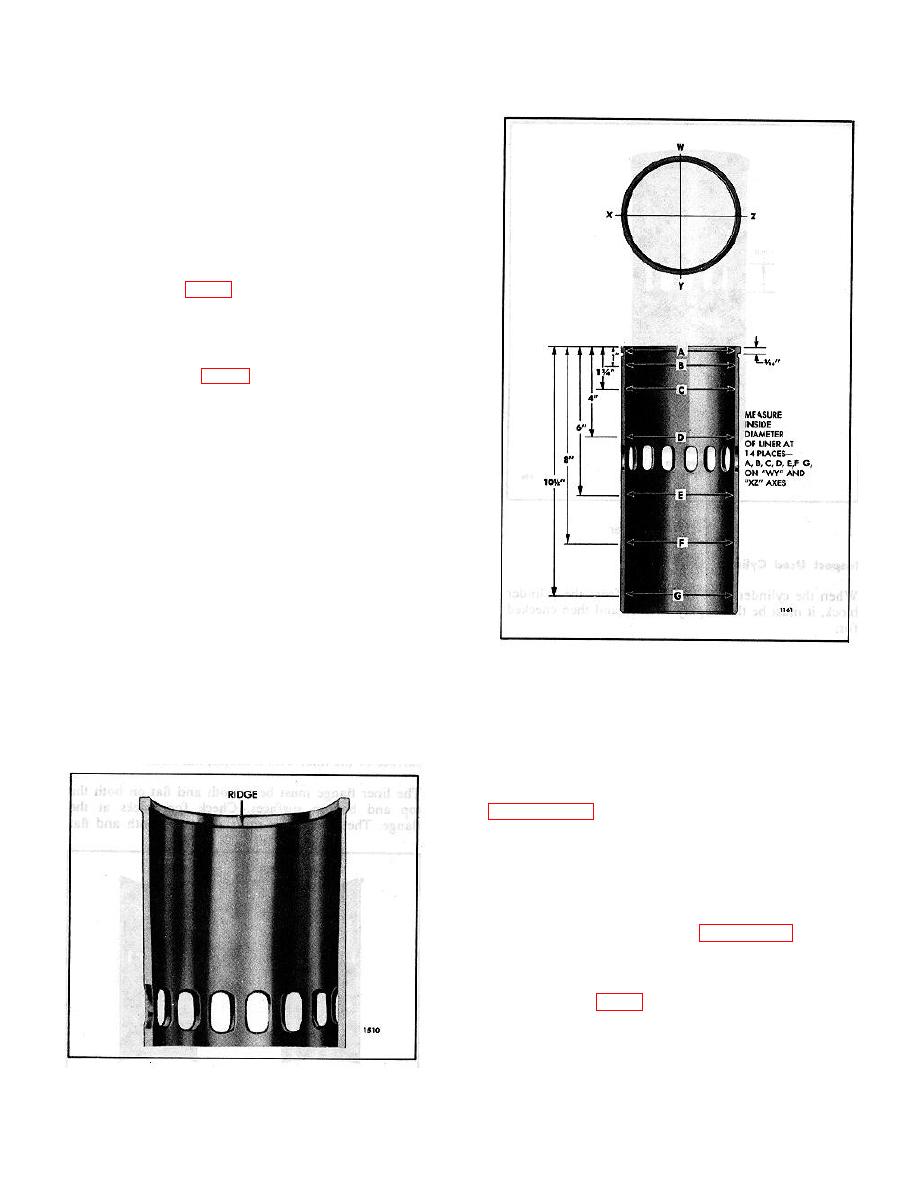
2. Remove the ridge (Fig. 6) formed at the top by the
piston ring travel. Otherwise, interference with the
travel of the new compression rings may result in ring
breakage.
Therefore, even though the taper and out-of-round are
within the specified limits, the glaze and ridge must be
removed by working a hone up and down the full length
of the liner a few times.
Place the liner in a fixture (a scrap cylinder block makes
an excellent honing fixture). However, if it is necessary
to hone a liner in the cylinder block that is to be used in
building up the engine, the engine must be dismantled
and then, after honing, the cylinder block and other parts
must be thoroughly cleaned to ensure that all abrasive
material is removed.
Fig. 7. Cylinder Liner Measurement Diagram.
The hone J 5902-01, equipped with 120 grit stones J
After the liner has been honed, remove it from the
5902-14, should be worked up and down the full length
fixture and clean it thoroughly.
Then dry it with
of the liner a few times in a criss-cross pattern that
compressed air and check the entire surface for burrs.
produces hone marks on a 45 axis.
'
After honing, the liner must conform to the same limits
on taper and out-of-round as a new liner and the piston-
to-liner clearance must be within the specified limits
Liner Measurements
Measure the block bore and the outside diameter of the
liner. If the liner-to-block clearance (with used parts)
exceeds .0025" it will be necessary to bore the block for
an oversize liner as outlined on Page 10-2-10.
Install the liner in the proper bore of the cylinder block.
Measure the inside diameter of the liner at the various
points shown in Fig. 7. Use cylinder bore gage J 5347-
01, which has a dial indicator calibrated in .0001"
increments. Set the cylinder' bore gage on zero
Fig. 6. Cylinder Liner Ridge Due to Wear.
10=2-94


