
TM 5-3895-359-14&P
If main hearing trouble is suspected, remove the oil pan,
a. To remove all except the rear main bearing
then remove the main hearing caps, one at a time, as
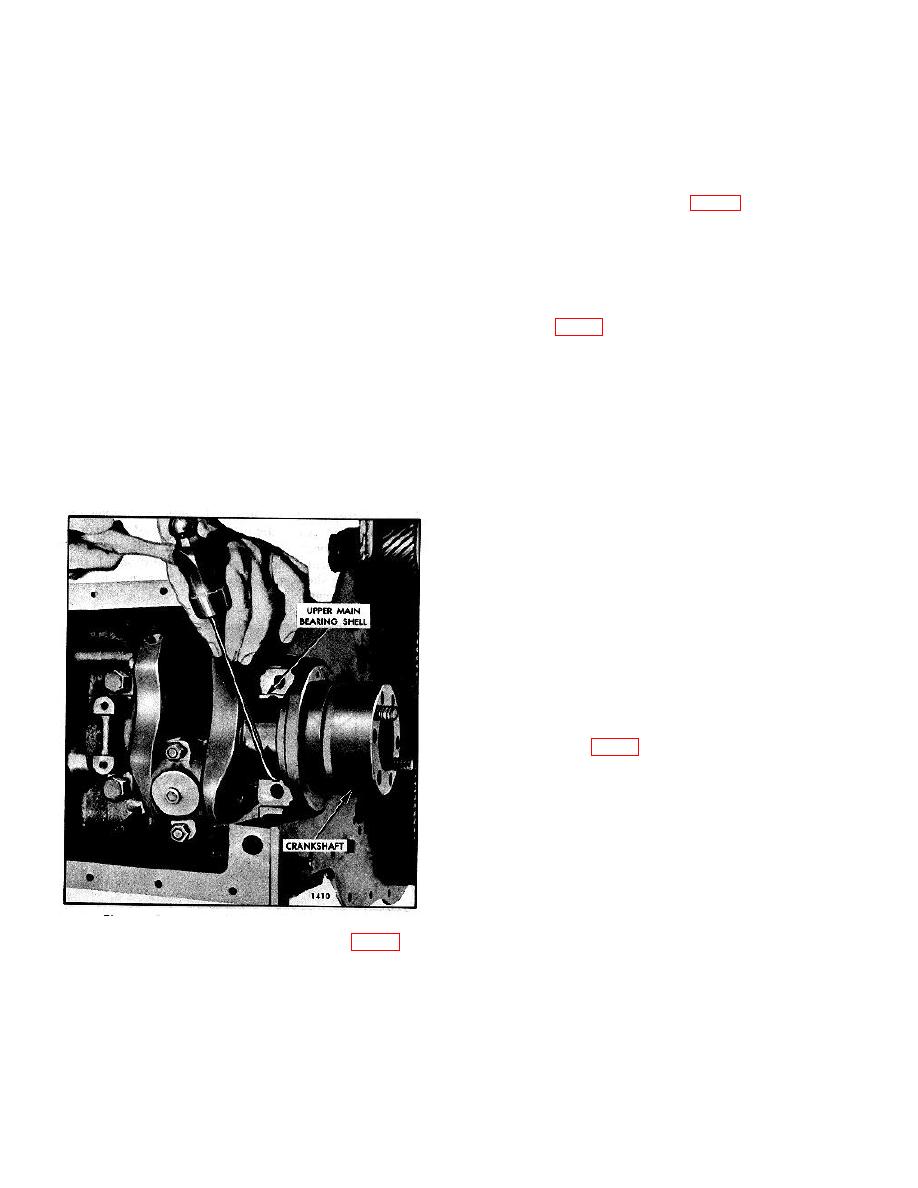
shell, insert a 1/4 " x I " bolt with a 1/2 "
outlined below and examine the bearing shells.
diameter and 1/16" thick head (made from a
standard bolt) into the crankshaft journal oil
Remove Main Bearing Shells (Crankshaft in Place)
hole. Then revolve the shaft to the right
The bearing caps are numbered 1. 2, 3, etc., indicating
(clockwise) and roll the bearing shell out of
their respective positions and, when removed, must
position as shown in Fig. 3. The head of the
always be reinstalled in their original position.
bolt must not extend beyond the outside
All crankshaft main bearing journals, except the rear
diameter of the bearing shell.
journal, are drilled for an oil passage. Therefore, the
b. Remove the rear main bearing upper shell by
procedure for removing the upper bearing shells with the
tapping on the edge of the bearing with a small
crankshaft in place is somewhat different on the drilled
curved rod, revolving the crankshaft at the
journals than on the rear journal.
same time to roll the bearing shell out as shown
Remove the main bearing shells as follows:
in Fig. 4.
1. Drain and remove the oil pan to expose the main
c. The lower halves of the crankshaft thrust
bearing caps.
washers will be removed along with the rear
2. Remove the oil pump and the oil inlet and outlet pipe
main bearing cap. The upper halves of the
assemblies.
washers can be removed for inspection by
NOTE
pushing on the ends of the washers with a small
If shims are used between the oil
rod, forcing them around and out of the main
pump and the main bearing caps,
bearing support.
save the shims so that they may be
reinstalled in exactly the same
Inspection
location.
Bearing failures may result from deterioration (acid
formation) or contamination of the oil or loss of oil. An
analysis of the lubricating oil may be required to
determine if corrosive acid and sulphur are present
which cause acid etching, flaking and pitting. Bearing
seizure may be due to low oil or no oil.
Check the oil filter elements and replace them if
necessary. Also. check the oil by-pass valve to make
sure it is operating freely.
After removal, clean the bearings and inspect them for
scoring, pitting, flaking, etching, loss of babbitt or signs
of overheating (Fig. 5). The lower bearing shells, which
carry the load, will normally show signs of distress
before the upper bearing shells. However, babbitt
plated bearings may develop minute cracks or small
isolated cavities on the bearing surface during engine
operation. These are characteristics of and are not
detrimental to this type of bearing. They should not be
replaced for these minor surface imperfections since
function of the bearings is in no way impaired and they
will give many additional hours of trouble-free operation.
Fig. 4. Removing Upper Rear Main Bearing Shell
Inspect the backs of the bearing shells for bright spots
3. Remove one main bearing cap at a time (Fig. 2) and
which indicate they have been moving in the bearing
inspect the bearing shells as outlined under Inspection.
caps or bearing supports. If such spots are present,
Reinstall each bearing shell and bearing cap before
discard the bearing shells.
removing another bearing cap:
10-2-60
