TM 5-3895-369-14
(a)
(b)
(c)
(d)
(e)
(11)
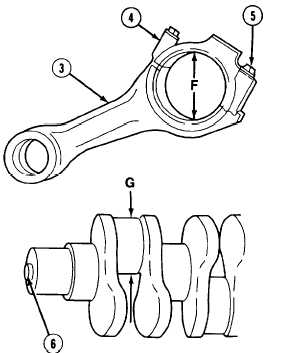
Determine rod bearing clearance for each
rod as follows:
Install six rod caps (4) on connecting
rods (3) with 12 screws (5). Tighten
screws 73 lb-ft (99 N-m).
Measure each connecting rod (3) at
position F. Record smallest diameter.
Measure crankshaft (6) at position G
for each rod (3). Normal measurement
is 2.7150 to 2.7170 in. (68.962 -
69.013 mm).
Add smallest crankshaft and connecting
rod measurements. Clearance should
be no greater than 0.0035 in.
(0.089 mm).
If rod bearing clearance exceeds
measurement limit, replace bearings. If
clearance still exceeds measurement
limit, replace connecting rod and
rod cap.
NOTE
To ensure proper measurement of rings,
install rings with printed side up.
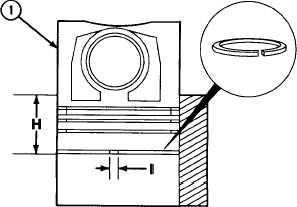
(12)
Install each ring in cylinder approximately
3.5 in. (89 mm) deep (position H). Level
ring using piston (1).
(13)
Remove piston (1) and measure each ring
gap at position I. If below or above limits,
replace ring. Normal measurements are as
follows:
(a)
Top ring is 0.0160 to 0.0275 in. (0.40 -
0.70 mm).
(b)
Intermediate ring is 0.0100 to 0.0215 in.
(0.25 - 0.55 mm).
(c)
Oil control ring is 0.0100 to 0.0215 in.
(0.25 - 0.55 mm).
5-165


